Prehistoric Native American Lesson Plan:
Pottery-making Methods
Introduction: Experimental Archaeologists learn how ancient
people made things by using ancient technologies to reproduce
their tools, pottery, weapons, clothing, ornaments, and structures.
Students can become experimental archaeologists on a small
scale by using three methods ancient people used to make pot-
tery before the invention of the pottery wheel. We do not have
the exact types of clays and tempers (additives to strengthen
clay); however, we can build pots using hand methods and
compare the results for strength, durability, and appearance.
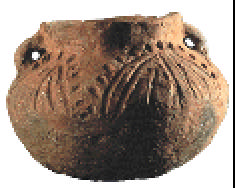
Oneota pottery jar from the Norris Farms #36 site
Illinois State Museum Web site used:
Museumlink Prehistoric Native American https://www.museum.state.il.us/muslink/nat_amer/pre/
index.html (Early Woodland to Mississippian pottery sections.)
Museumlink Historic Native American https://www.museum.state.il.us/muslink/nat_amer/post/htmls/
te_contain.html section on containers and the illustration on https://www.museum.state.il.us/muslink/
nat_amer/post/htmls/arch_anc.html.
Objective: After reading the pertinent Web site sections, the introduction to techniques, and doing the
activity, students will be able to produce pottery using ancient methods of construction. They will be
able to explain and demonstrate the three methods (modeling, coiling, and molding) and pottery's
advantage over skins, gourds, and woven reeds.
Time Required: Two class periods
Grade Levels: 3-12
Motivation: Discuss the fact that Native Americans in Illinois did not have pottery until the Early
Woodland period and explore what living conditions favored this development. Summarize the methods
used (handout sheet) and predict the advantages and disadvantages of each.
Discuss how we know about these ancient methods, referring to the specialists in the With a Little Help
from Our Friends Activity.
Materials:
·
clay (if possible, the kind that can be fired in a kiln so students will see differences
between air-dried and kiln-dried ware)
·
access to a kiln (optimal), perhaps at the local high school or at a ceramics studio.
·
simple tools such as a popsicle stick or cuticle stick
·
molds such as ceramic or wooden bowls (wax-paper lined, or smeared with dish deter-
gent so the clay can be easily removed)
Prehistoric Native American Activity: Pottery --page 1 of 5
Procedure: see attached instruction sheet
Assessment: Have students fill out the comparison form for the three pottery-making methods. Younger
children can form a pot with one method and be able to tell what they did.
Resources:
Rice, Prudence M. Pottery Analysis: a sourcebook. University of Chicago Press, Publication 609. 1987.
Shepard, Anna C. Ceramics for the Archaeologist. Carnegie Institute of Washington, Publication 609,
1980.
Illinois Goals and Standards addressed:
Science: Goal 11: Understand the processes of scientific inquiry and technological design to investigate
questions, conduct experiments, and solve problems.
Social Studies: Goal 16: Understand events, trends, individuals, and movements shaping the history of
Illinois, the United States, and other nations.
Standard E: Understand Illinois, United States, and world environmental history.
Late Elementary: 16:E.2a: Describe how people in hunting and gathering and early
pastoral societies adapted to their respective environments.
Late High School: 16.E.5a: Analyze how technological and scientific developments
have affected human productivity, human comfort, and the environment.
Prehistoric Native American Activity: Pottery --page 2 of 5

Pottery-making Methods
Try making a small container using each of the methods described
below.
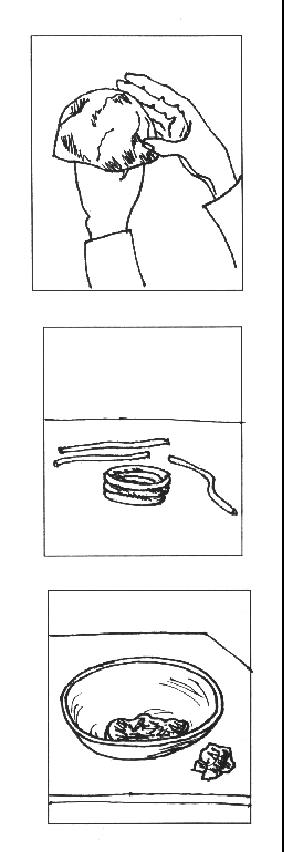
Method #1: Modeling
·
Take a three-inch diameter lump of clay, roll it out
flat like pie crust 1/4 to 1/2" thick, drape it around
your fist, and tap it with a flat stick to mold it into
a jar shape.
·
Turn your fist inside the clay so that all sides are
modeled. The walls should be of an even thick-
ness; the bottom will be flat or slightly curved.
Are there limits to the size and shape of the pot with this method?
Method #2: Coiling
·
Take a lump of clay and separate it into several
smaller lumps.
·
Flatten one lump of clay to make a flat base of a
container, perhaps 2-3 inches across and about 1/4
inch thick.
·
Roll the other lumps into long `snakes' of equal
thickness.
·
Press the first snake on the edge of the base to
make the first row of coiling. Each row of coils is
pressed or pinched on to the row below it to bond
them together.
·
It is also possible to coil longer lengths of clay into
a spiral coiling with the same pinching method.
·
Keeping the clay moist while adding coils is
important for bonding.
Is it possible to form a larger variety of shapes using this method
than with the modeling method? Why or why not?
Method #3: Molding
·
Take a lump of clay and press it into a mold, such
as another container, and smooth the clay so it is
the same thickness.
·
Remove the new container from its mold.
What shapes can and cannot be formed using this method? Why?
Prehistoric Native American Activity: Pottery --page 3 of 5
Prehistoric Native American Activity: Pottery--page 4 of 5
modeling
coiling
molding
ease of
construction
strength
versatility
of shapes
appearance


Lesson Extension: Mississippian Incised Pottery and Effigy Pottery
Procedure: Students will have looked at samples of incised pottery and effigy pottery in the Mississip-
pian and Oneota sections of the Prehistoric Native American Web module, noticing or making sketches
of types of incised designs (lines of feathers, geometric slashes and shapes, dots, etc.) and the shapes of
animal effigy pottery.
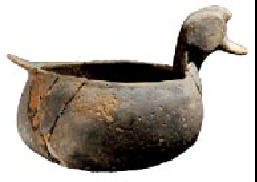
Effigy Pottery
Effigy pottery has the shape of an animals attached to it
(perhaps on one side of the rim) or in some cases the vessel
itself is in the shape of an animal.
Choose an animal you would like to use to make your effigy
pot. Form a pot in one of the three ways detailed in this
lesson. Use your fingers to form the head of an animal with a
small lump of clay. Pinch it securely to the rim of the pot,
Duck effigy bowl from Dickson Mounds Museum
smoothing the clay to remove the seam.
Incised Pottery
Incised designs were made when the clay was still wet, when it was dry before it was fired, or even after
it was fired. Popular areas of the vessels to incise were: rims, outside walls of bowls, necks and shoul-
ders of urn-like vessels.
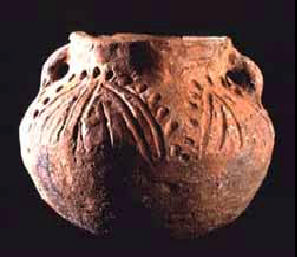
Use the wooden sticks or your fingernails to incise
designs into the wet clay. The Oneota, like people of
many other world cultures, made their incised designs
symmetrical, and repeated in rows. The tools should
cut deep enough to make visible impressions, but not
so deep as to cut through the clay or weaken the walls
of the vessel.
MB#7- incised Oneota jar from Norris Farms #36
Prehistoric Native American Activity: Pottery -- page 5 of 5


