Keeping Us in Stitches: Story Quilt Activity
Purpose: to help students understand that some quilters can tell a story by using quilting and
painting techniques on fabric.
Grade Levels: 2¡6 as written.
Time Required: Four class sessions of sixty minutes each will
be needed to complete the project.
Day 1: introduction to project, view video if available(or
read the book), demonstrate, and begin work;
Day 2: student continue production, using fabric cray-
ons (transfers will be done by teacher);
Day 3: students will transfer their sketch to cloth and
then paint it with watercolors (teacher could sew three
sides of backing, batting assembly);
Day 4: students will receive guided practice on a whip
stitch, will close the fourth side, and tie knots at inter-
vals for the quilting stage.
Web Resources for this activity:
Illinois Quilts and Quilters: Keeping Us in Stitches:
https://www.museum.state.il.us/muslink/art/htmls/ks.html
pieced quilt block designs and Bertha Stenge appliquÚ quilt.
Faith Ringgold's Web site, "any1canfly," includes a biography, photos of the artist and
many of her quilts, and a list of her books for children at
https://www.artincontext.org/artist/
ringgold/
About.com quilting page features an image and brief history of some traditional quilt block
patterns, which can be used for ideas for borders.
https://miningco.com/hobbies/quilting/
library/weekly/aa042797.htm
World Wide Quilting Page of block patterns and instructions on how to make them.(again,
for border ideas)
https://ttsw.com/Blocks/AlphaBlockList.html
Objectives:
This lesson is organized on Discipline-Based Art Education methods, so there are four objectives,
one for each of the art disciplines as outlined in the method.
Art History: Students will demonstrate an understanding of the art of Faith Ringgold, Afri-
can-American painter/quilter and Bertha Stenge, Illinois quilter, by creating a small quilt piece
using the techniques and format they use.
Art Criticism: Students will study and compare the elements and principles of design in the
quilts of Faith Ringgold and Bertha Stenge's Quilting Party and will implement a better under-
standing of the use of design, line, shape, color, and balance reflected in their design.
Art Production: Students will show increased proficiency with the tools and materials
(needle and thread) and media (paint, fabric, and fabric crayon) used in this project, and use
them safely.
Aesthetics: In a self-assessment and exhibit, students will judge the quality of their use of
the elements and principles of design, using a given and practiced vocabulary.
Keeping Us in Stitches Activity: Story Quilts, page 1 of 5
Vocabulary:
batting
border
central image
heat transfer process
quilting
quilt sandwich
running stitch
story quilt
whip stitch
Motivation on Day 1: Students will
À
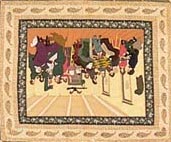
view the appliquÚ quilt of Bertha Stenge, Quilting Party, and read the text about the quilt
and about quilting parties or bees.
https://www.museum.state.il.us/muslink/art/htmls/
ks_appliq.html#
À
view the painting from which Bertha took her design for the center medallion of this quilt:
https://www.artsednet.getty.edu/ArtsEdNet/Images/P/quilting.html
and list the elements of
her quilt design; geometric border and narrative picture in the center.
À
view the Faith Ringgold Web site at
https://www.artincontext.org/artist/ringgold
and, if
possible, the video, The Last Story Quilt, about Faith Ringgold and list the techniques of her
quilt design: geometric borders, written narrative, and narrative painting in the center.
À
in comparing and contrasting Stenge's quilt with quilts by Ringgold, lead a discussion with
students to come up with words to describe the mood, use of color, value, and movement
created in the work. Look at concepts like balanced or unbalanced, traditional or contempo-
rary, colorful or dull, full or empty, etc.
À
summarize the techniques used in both quilts; sewing and painting.
À
brainstorm what kinds of stories they could write and draw on their quilt. Bertha's quilt is
about traditional customs in quilting. Faith's quilts are about the artist's life and African-
American history and culture.
À
The students could do a sketch of ideas assigned as homework if there is not enough time in
class for sketching ideas.
Materials:
For each student:
For class use:
15" Î 15" paper
examples of traditional quilt patterns (WWW or books)
16" Î 16" white fabric (muslin, cotton)
images of Faith Ringgold's story quilts (WWW or books)
fabric crayons
iron for teacher use
batting
sewing machine for teacher use
needle
white thread
scissors
quilting pins (longer, with bead heads)
18" ruler
printout of Stenge quilt and a Ringgold quilt
pencil
watercolor paints, brushes, cups for water
permanent-ink fine-point pen
Faith Ringgold video, if possible
Procedure:
Day 1: See motivation above.
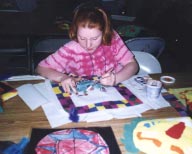
Day 2: Drawing and Coloring Geometric Borders
À
Students measure a 2" border on their 15" square paper
with a ruler. They section off the border into squares or
rectangles, in which they draw geometric block shapes,
such as triangles, diamonds, stripes, checkerboard, etc.
(see photographs for examples.)
À
Students color in the block designs with fabric crayons,
being sure to press down hard to put down a heavy coat
of wax on the paper. Do not worry about broken crayons;
the heavier the color layer, the brighter it is when irioned
onto cloth. A light coloring will iron on lightly with white
areas.
À
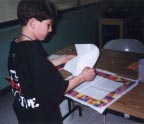
The teacher will have an ironing corner set up on a table
with a dish towel over some newspapers or an ironing pad. As students finish their borders,
they will bring them and their fabric square up to be ironed. This heat transer process will
transfer the fabric crayon drawing from paper to fabric.
À
Iron with a dry iron on HOT (between wool and cotton), with a pressing cloth (piece of
scrap muslin that can be frequently replaced). Keep the iron moving slowly over the surface
of the fabric, following the edges of the borders. Check after one minute to see if wax has
melted to produce a strong color. (It is suggested that the teacher try this out ahead of
time). If more heat is needed, remove the pressing cloth and iron on the paper.
Day 3: Painting the story (narrative)
À
Students bring a sketch of their idea for a central image to class, briefly have it checked
with the teacher to discuss composition, completeness, etc.
À
Students will then transfer their sketch to the center of their cloth with pencil, making it fit
inside the borders and allowing at least a one or two inch band at the bottom for adding
text.
À
Students will use watercolor paint (dry-brush technique, not washes) and brushes to paint
the image. Let dry.
During the week, the teacher (or quilter volunteer)
will use the sewing machine assemble the quilt
sandwich.
Directions: Hold the batting, backing, and the quilt
top (turned face down) together and pin the
edges. Sew around three sides. Clip off points of
each corner. Turn inside out and press or finger
press.
Day 4: A 1" to 2" horizontal band across the picture
just above the lower border is used to hold the
written story of the quilt. Students will use first a
pencil and then a black permanent fine-point pen to
copy the story of their image (see writing lesson).
They will use quilting pins to pin together the fourth
side of the three layers to close the quilt.
They will sew with needle and thread to whipstitch
the backing layer to the top (see instructions).
https://www.museum.state.il.us/muslink/art/htmls/
ks_tech_epp.html
When they finish stitching, they
will take three stitches in the same place and cut
the thread.
Writing Lesson Suggestions:
À
This part of the lesson can be taught in an integrated lesson by the art teacher, or in coop-
eration with the homeroom or language teacher. Students with special writing or language
needs may want to write and edit in their language class and bring the final copy to art for
copying.
À
Each student should write a short (1 paragraph) story that describes the emotions, impor-
tance, essence, or characters and action of their narrative painting.
À
Two to three full sentences will fill 1" to 2" area provided for their narrative.
À
Students will discuss the directions, write a draft, edit it for content, then for form.
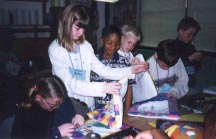
Assessment:
À
Students will exhibit their work in class or in the school (see photograph).
À
They will have a class discussion that centers on their use of the technical vocabulary listed
above.
À
Each student will decide which vocabulary words fit their project, not as judgments of good
or bad, but as descriptions of the mood, use of color, value, and movement in each work.
One quilt might be dull because it uses muted colors and has a quiet or sad mood. One
composition may be full of details, while another may be more minimalist or empty.
À
Each student should be able to state the main characteristics of a story quilt, as made by
themselves, by Bertha Stenge, and by Faith Ringgold.
Quilt top face down
Backing cloth face up
Batting layer

Lesson Extension: Quilting
Students who want to quilt their borders with needle and thread can practice on scrap cloth
making even running stitches. They would probably choose to follow the lines of their geometric
pattern, which in traditional pieced quilting would be called "stitching in the ditch (the seamline)."
See Quilting with Children https://www.thecraftstudio.com/qwc/ and look under "Techniques and
Resources" for helpful instructions.
Illinois Goals and Standards addressed:
Visual Art: (early elementary and late elementary)
Goal 25: Know the Language of the Arts
Standard A. Understand the sensory elements, organizational principles, and expressive
qualities of the arts.
Standard B: Understand the similarities, distinctions, and connections in and among the
arts.
Goal 26: Understand how works of art are produced through creating.
Standard A: Understand processes, traditional tools ,and modern technologies in the arts.
Standard B: Apply skills and knowledge necessary to create in one of the arts.
Goal 27: Understand the role of the arts in civilizations, past and present.
Standard A: Analyze how the arts function in history, society, and everyday life.
Language Arts: Writing
Goal 3: Write to communicate for a variety of purposes.
Standard A: Communicate ideas in writing.
Standard B: Compose well-organized and coherent writing for specific purposes and
audiences. (One-paragraph story of the scene painted on the quilt top).
Standard C: Use correct grammar, spelling, punctuation, capitalization, and structure.
Quilt Exhibit at Butler School, Springfield, Illinois