

Activity: Polymer Clay Millefiori Cane Beads
Objectives: Students will show an understanding of how millefiori beads are constructed by making some in several styles in polymer clay. .
Age: approximately 10 through Adult
Time Required: 60-90 minutes to form and cut beads(enough for a necklace); 30 minutes to bake; 30 minutes to stringImage: Detail of bead card showing beads wrapped with millefiori slices
Museum Web site URL: https://www.museum.state.il.us/ismdepts/anthropology/collections/frost_beads.php
Frost Trade Bead Collection online https://www.museum.state.il.us/exhibits/barker/techniques/tech_millefiori.php
Barker Paperweight Collection Web module with a gallery of millefiori weights and instructions and diagrams of the technique.Motivation: Venetian glass millefiori beads have complex patterns that reflect the multi-step process of construction. Designs are endless, and by going through the process using polymer clay instead of molten glass, more people can understand and appreciate them. Native American tribes traded pelts and other objects for these beads and for seed beads. They saw the advantage of getting many colors of hard, glass beads without having to shape and drill them themselves. This trade eventually caused the waning of the use of porcupine quills and bone and shell beads. It also led to an evolution in beading patterns and techniques, influenced by styles in the larger culture. Learn how these beads were made and adapt the patterns to your own designs.
Although millefiori beads look very complicated in design, the process is simple when broken down into steps. Keep in mind the methods used by glass artists when working with the clay.
Image: sample necklace and earrings
of three types of millefiori patterns;
bull's eye, spiral, and lace.
Materials:
For Forming Beads:
- two or more packages (and colors) of Sculpey III® polymer clay (softer to work with than Fimo® and some other brands
- plastic wrap for rewrapping unused clay
- Plexiglas slab or paper for rolling surface
- clay slicing tool (or single edge razor blade*) *
- CAUTION: A dull blade may be safer, but distorts the clay as it smashed it when cutting.
- wood or plastic brayer (or side of a dedicated drinking glass)
- toothpick or tapestry needle for drilling holes in beads
For Baking:
- dedicated oven-proof glass dish or plate (obtained at thrift store; use glass if clay will touch the surface of pan; metal pan is okay if you use paper to line the pan; this prevents flat shiny spots on one side of bead)
- oven thermometer
- oven (toaster ovens are okay if the upper coils
won't burn the clay and emit poisonous fumes)- pot holders
For Stringing:
- beading nylon monofilament
- beading wire
- elastic twine, or beading twine (depending on size of bead holes, and preferences)
- jewelry findings (such as necklace clasps, earring fasteners, T-pins)
- needle nose pliers
- scissors
Precautions:
- Wash hands after handling clay or before changing colors if hands are stained.
- Clean oven (with baking soda solution) after using it to bake clay.
- Do not use pans and utensils for food after using them for clay (buy cheap ones at a thrift shop.)
- Do Not raise oven temperature above 265°. It is better to bake longer at a lower temperature than risk burning and fumes. Read package directions thoroughly.
Procedure:
- Look at examples of millefiori cane designs in the paperweights (and the basic designs in the worksheets).
- Choose one cane style as your first. Select the clay colors with which you will work.
- Prepare the clay. (If teaching this craft to children, try the steps out ahead of time and demonstrate each step for them.
Preparing the clay:
- Cut or pull of one section of the clay from one package
- Knead the clay with your fingers until it is becomes soft, but not until it becomes sticky or loses its pliability (rest or refrigerate it if this happens).
- Repeat with other colors you will use (estimate how much clay you will need of each color-1/4 of package for main color; 1/8 for secondary colors).
Forming Canes: See graphics and directions below..
Slicing Canes:
- With caution use a thin, very sharp cane cutter (purchased at a craft store) or a single-edge razorblade.
- Lay a ruler next to the cane in order to cut multiple slices the same thickness (to form beads of the same size).
- Place the cutter on top of the cane and press down smoothly, cutting through the clay. If clay is too soft (or the blade too dull), the blade will push the cane flat. If this starts to occur, rest the cane (or put in the refrigerator for 10 minutes) and try again.
Forming Beads:
- You may use the slices directly as cylindrical beads, and drill a hole through them, either vertically or horizontally.
- You can roll each bead in your palms, forming a round bead.
- Very thin slices can be placed as a veneer over an inner ball of plain or scrap clay. This is a good method for forming large beads. The slices can veneer over a compressed tinfoil ball base, too, to save clay. These beads will appear as those in the image at the top of this page.
Drilling Holes in Beads:
- Hold bead with fingers of one hand while slowly rotating and pushing round toothpick or darning needle horizontally through bead. Then turn the bead around and drill hole from the other side (to avoid exit bump)
- Place bead on table. Push needle straight down through bead from the top. Turn bead over and repeat from opposite side. If bead flattens, lightly roll in hands to reform.
- NOTE: Holes can be drilled through baked clay, but you need a drill, and it makes clay dust, creating the nedd to wear a dust mask.
Baking Clay:
- Read the instructions for baking on the back of the clay wrapper.
It is important to know if your oven's temperature is actually the same temperature at which it is set. An inexpensive oven thermometer can tell you. Otherwise, set the temperature about 25° lower than the 265° in the directions. That will give you some leeway for safety. The clay will still bake, but more slowly (but it will not burn and give off toxic fumes).- 1/4" beads should bake in about 20 minutes. If beads are still rubbery after they cool, they are underdone. They can be rebaked for 15 minutes.
Stringing a Necklace:
- String beads on your choice of stringing material. Measure out at least 6 inches extra of the string for ease of tying off.
- If you are maing a necklace, use filler beads bought at a craft store to avoid having to make dozens of beads for your first project. It also add variety to the design.
- Tie of each end of the string onto a clasp or screw-in fastener of your choice using several knots. You can avoid having to do this if you use elastic string, which you can tie together at the ends, or if necklace or bracelet is made long enough to slip over head or hand. Try a few alternatives to find one that suits you.
Illinois State Goals and Standards addressed:
Visual Arts:
Goal 26: Understand how art is produced (glass, clay)
More information for this activity is in the introduction through the Morton D. Barker Paperweight Collection's techniques sections that explain how glassmakers formed millefiori canes of glass. The structure of the canes is the part that is covered in this lesson with a safer material, polymer clay. Use materials to create a functional and decorative object.
Extension:
Goal 27: Role of the Artist in Civilization
Research the relationship among artisans in Europe who were producing a product (millefiori beads), traders who shipped this product to another culture, and Native American artisans who created objects using these beads. How did different cultures use the same objects? (Look at the Barker Paperweights millefiori weights to see how Victorian Europeans used products made w ith millefiori techniques, as an extension).Assessment: Students work should reflect their knowledge of cane structure (e.g., their beads are bull's eye, jellyroll, marbleized, or compound designs using two or more colors of clay). They should be able to recognize these basic canes in the online paperweights or other glass objects. They should be able to describe their process and relate it to the glass-cane-making process.
How to Make Canes:
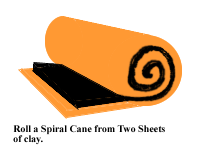
Spiral Cane: Roll out two squares of clay. Layer them. Trim the edges. Roll them into a log from one edge, pressing down to seal layers. Cut into beads.
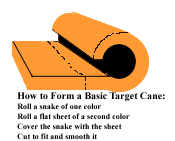
Target Cane: Roll one section of clay into a flat, square layer. Roll another color section into a snake or cylinder. Wrap the flat layer around the log and press as you roll. Trim any extra. Cut into beads.
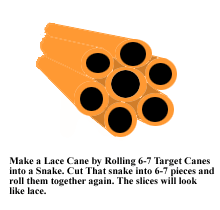
Lace Cane: Make a target or spiral cane. Roll it out into a long snake. Cut it into ssections and stack. Roll out again. Slice it very thinly. Use the slices to laminate to the outside of a ball of clay to make a bead.


